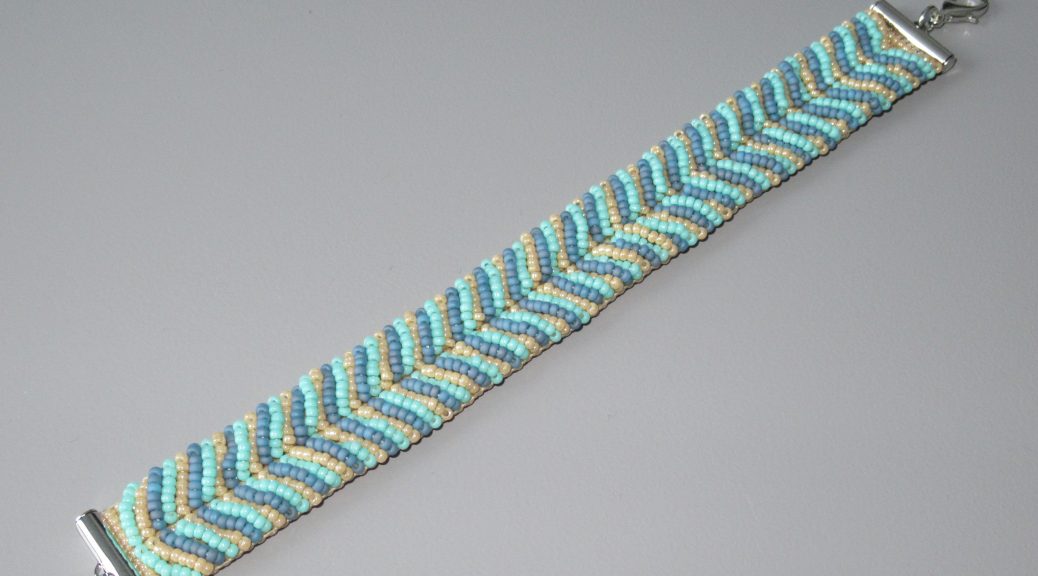
Jody has a nice variation on the woven bracelets that make these bracelets extra fun to make and to wear. She was so kind to make a tutorial for us. Keep on reading for the tutorial.
Below you can read the step-by-step explanation. The base for these bracelets is a woven bracelet. You can change the width and length of the bracelet to your preference, but make sure you make this woven piece longer than you want the bracelet to be, because the loops will shorten it. You need to make sure the amount of seed beads per row is an uneven number. The colors used for this bracelet are 11-593, 11-4472 and 11-2038.
When you start making this bracelet, keep in mind that the bracelets get a little wider because of these additions. Where normally 13 seed beads fit in a metal locket of 20mm, with these bracelets it is only 12 seed beads.

Necessities
- Bead cord, in this example beige C-lon bead cord D is used.
- Metal clips with a lock and extension chain, in this example the 20mm clips is used
- beadalon beading mat
- beadalon beading scissors
- eventual the beadalon beading scope or beading tray, so you can easily pick up the beads afterwards
- A needle, for example the Tulip #10 long needle
- Hasulith jewelry glue (when extending the bead cord)
Instructions
- The base of this bracelet is a woven bracelet. On this woven piece, only one long thread should still be visible. You need to make sure that there still can fit some thread through the seed beads in the woven piece. With the long remaining thread the add-ons will be attached to the woven piece. The thread should stick of the side of the second row (see picture).

End the thread at the end of the second row of the woven piece.
- Take 8 seed beads and put them on your needle. Put the needle in the third row from the row where the thread starts. Put the needle in the middle and point it to the side. Pull the needle gently through the woven piece. The bracelet in the example is 13 rocailles wide. The thread goes through the six seed beads on the left. The seed beads in the middle (so the 7th seed bead) is skipped.

Pull the needle from the middle to the side.
- Repeat this step until you reach the bottom of the bracelet. Leave the bottom row free. To the last row you’ll attach the metal clip at the end. With the last row of seed beads you don’t put the needle to the side of the piece, but 1 seed bead to the right so you can start with the other half of your bracelet.

End one seed bead to the right so you can start with the add-ons on the other half of the bracelet.
- When all the hoops on one side are secure, pull these extra tight one by one just to be sure that there are no loose loops.

Make sure the loops are all secure and start with the other half.
- Take 8 seed beads and put these on your needle. Stick the needle in the third row from where you’ve ended the thread on the other half. Put the needle in the side of the woven piece and pull the thread to the middle through 6 seed beads. The thread comes out of the woven piece in the middle. Repeat this step until you’ve reached the top of the bracelet.

Pull the needle from the right to the middle.
- When you make the last loop, the thread with the 6 seed beads comes out of the bracelet in the middle, just as with the other hoops. String the needle one row down from the 7th seed bead through the rest of the row. The thread comes out of the left side of the bracelet, one row below the first loop.

The thread sticks out of the side, one row under the row of the first loop.
- Continue the add-ons with the second color, by repeating the steps from step 2 to step 6.

The loops of the second color get attached the same way as the loops of the first color.
- Next, the add-ons of the third color gets attached. Repeat steps 2 through 6 again. Watch out: with the third color it gets harder to see through which row the needle should go, so be careful. The loops of the third color fall between the loops of the first and second color, so the gaps get filled. Remember to still keep the last row free to attach the metal clip.

Make sure you put the loops on the right rows with the third color.
- Cut the end of the thread and slip the metal clip over the last row. The open clip on one end can be closed with pliers. Put the pliers on the on the part of the clip that’s already bended. The last piece can be closed by putting the pliers against the clip. Watch out for making scratches, so do this softly.

The result.
Have fun making the bracelet! If you have any questions, don’t hesitate to ask.

